Creating a Dynamic Inventory Script for Ansible

It seems no one has written a blog post on creating dynamic inventory scripts for Ansible in a while. I feel this topic could use an update as some of the information I found was incomplete or out of date.

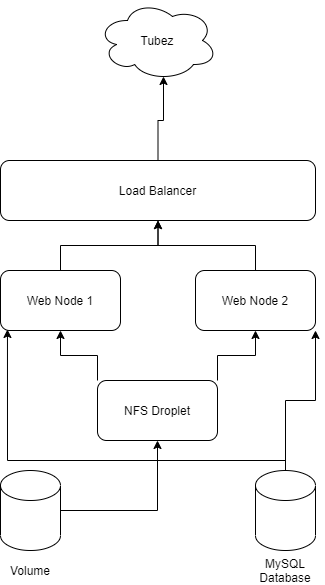
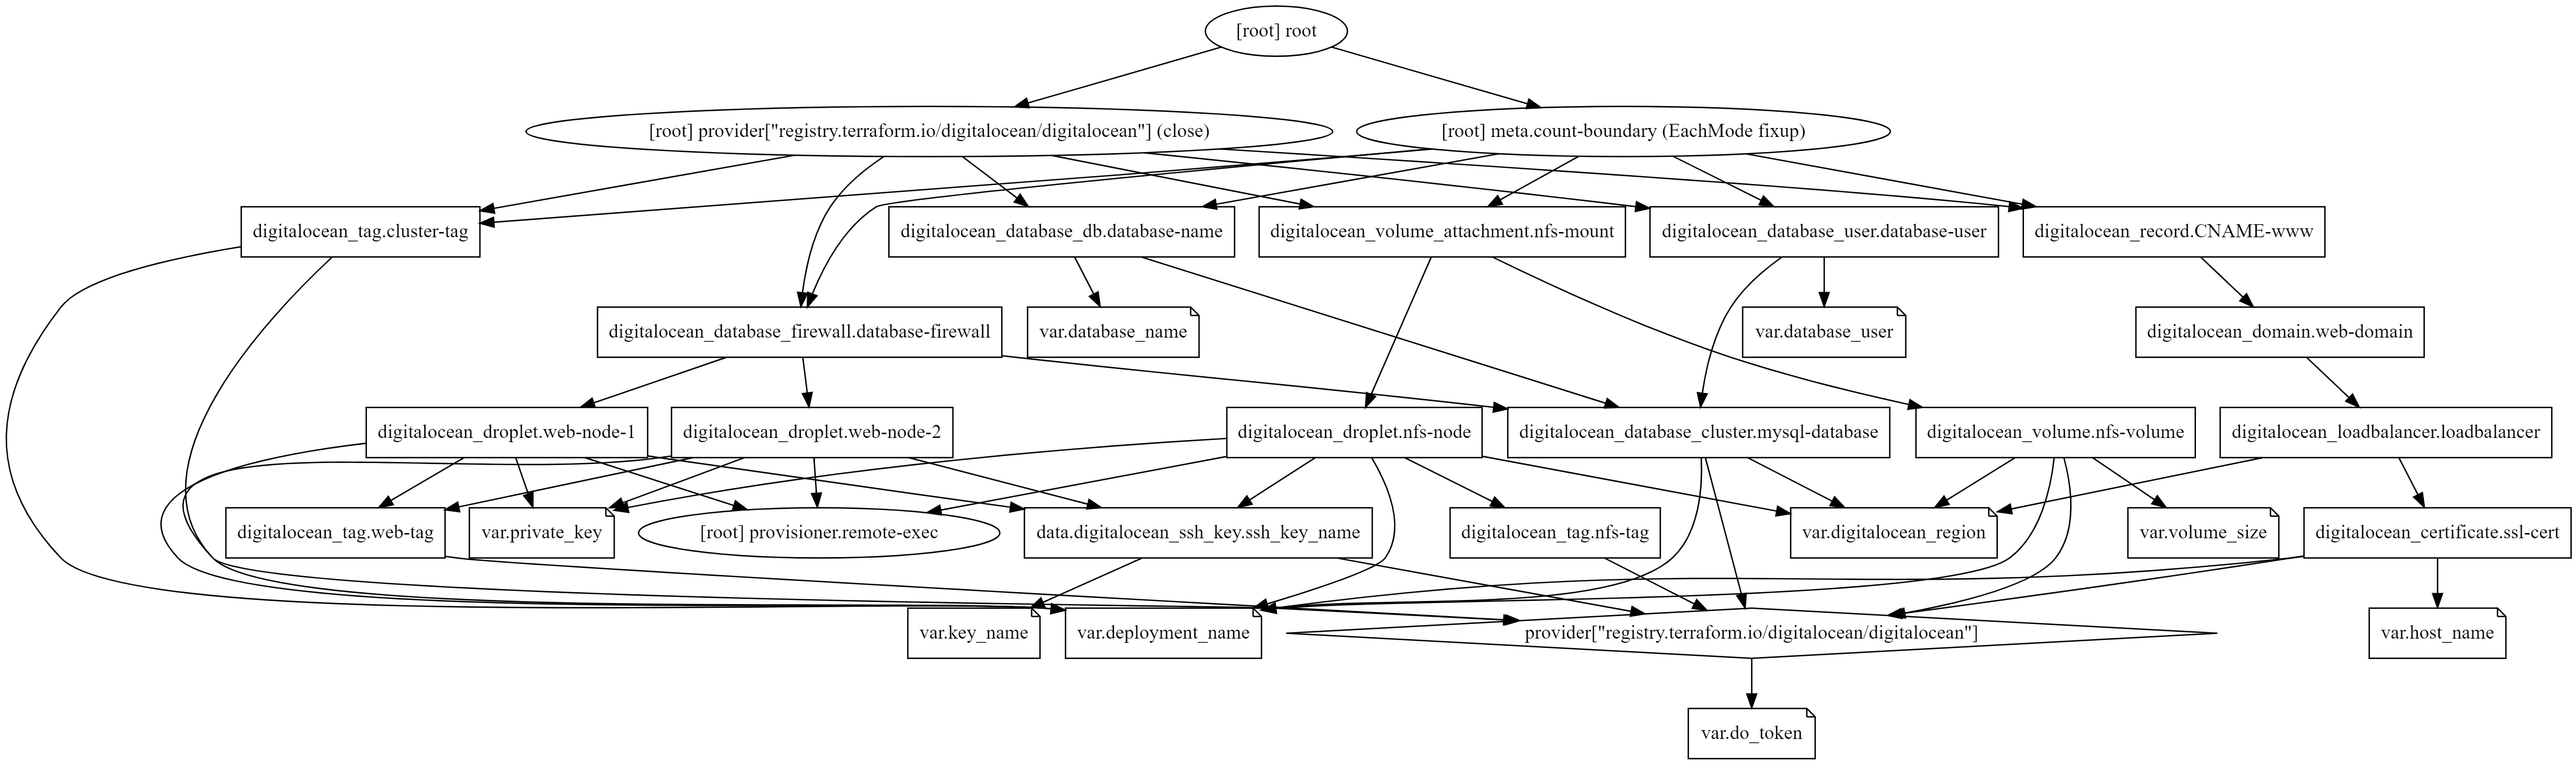
My goal is was convert Terraforms’s tfstate data from DigitalOcean to a usable inventory script. Keep that in mind as it drove many specifics on how the script works. I want to also note that the script I reference is a first pass at getting a working inventory script.

So first, the script (in its current state):

#!/usr/bin/python3

import subprocess
import argparse
import json

relevant_tf_state_values = {
    'digitalocean_droplet': ['name', 'ipv4_address', 'ipv4_address_private', 'tags'],
    'digitalocean_database_cluster': ['name', 'host', 'private_host', 'port'],
    'digitalocean_database_user': ['name', 'password'],
    'digitalocean_database': ['name'],
    'digitalocean_domain': ['id'],
    'digitalocean_volume': ['name', 'size', 'initial_filesystem_type'],
    'digitalocean_ssh_key': ['name', 'fingerprint']
}

extra_vars = {
    'ansible_ssh_user': 'root',
    'web_mount_point': '/mnt/nfs/data',
    'web_mount_point_type': 'nfs',
    'ansible_ssh_common_args': '-o StrictHostKeyChecking=no -o userknownhostsfile=/dev/null'
}

class DigitalOceanInventory(object):

    def __init__(self):
        self.tags = []
        self.droplets = []
        self.vars = {}
        self.inventory_json = json.loads(self._get_terraform_output())
        self._generate_groups()
        self._generate_vars()
        self.ansible_inventory = self._generate_ansible_inventory()
    
    def _get_terraform_output(self):
        process = subprocess.Popen(['terraform', 'show', '-json'],
                                   stdout=subprocess.PIPE,
                                   stderr=subprocess.PIPE,
                                   universal_newlines=True)
        stdout, stderr = process.communicate()
        return stdout

    def _parse_resource(self, resource, resource_type, relevant_objects):
        data = {}
        for key, value in resource['values'].items():
            if key in relevant_objects:
                data[f'{resource_type}_{key}'] = value
        return data

    def _generate_groups(self):
        tags = 'digitalocean_tag'
        droplets = 'digitalocean_droplet'
        for resource in self.inventory_json['values']['root_module']['resources']:
            if resource['type'] == tags:
                self.tags.append(resource['values']['name'])
            elif resource['type'] == droplets:
                self.droplets.append(self._parse_resource(resource, droplets, relevant_tf_state_values[droplets]))

    def _generate_vars(self):
        for resource in self.inventory_json['values']['root_module']['resources']:
            if resource['type'] in relevant_tf_state_values.keys() and resource['type'] not in \
                    ['digitalocean_tags', 'digitalocean_droplets']:
                for key, value in resource['values'].items():
                    if key in relevant_tf_state_values[resource['type']] and key not in ['ip', 'tags']:
                        resource_id = resource['type']
                        self.vars[f'{resource_id}_{key}'] = value
                for key, value in extra_vars.items():
                    self.vars[key] = value

    def _generate_ansible_inventory(self):
        inventory = {}
        for tag in self.tags:
            hosts = []
            public_ips = []
            private_ips = []
            inventory[tag] = {}
            for droplet in self.droplets:
                if tag in droplet['digitalocean_droplet_tags']:
                    hosts.append(droplet['digitalocean_droplet_ipv4_address'])
                    public_ips.append(droplet['digitalocean_droplet_ipv4_address'])
                    private_ips.append(droplet['digitalocean_droplet_ipv4_address_private'])
                inventory[tag]['hosts'] = hosts
                inventory[tag]['vars'] = self.vars
            ansible_tag = tag.replace('-', '_')
            inventory[tag]['vars'][f'{ansible_tag}_public_ips'] = public_ips
            inventory[tag]['vars'][f'{ansible_tag}_private_ips'] = private_ips
            if 'digitalocean_volume_name' in inventory[tag]['vars']:
                nfs_mount_point = str('/mnt/' + inventory[tag]['vars']['digitalocean_volume_name'].replace('-', '_'))
                inventory[tag]['vars']['nfs_mount_point'] = nfs_mount_point
        inventory['_meta'] = {}
        inventory['_meta']['hostvars'] = {}
        return inventory

    def get_inventory(self):
        return json.dumps(self.ansible_inventory, indent=2)


def main():
    parser = argparse.ArgumentParser()
    parser.add_argument('--save', '-s', help='Generates Ansible inventory and stores to disk as inventory.json.',
                        action='store_true')
    parser.add_argument('--list', action='store_true')
    args = parser.parse_args()
    do = DigitalOceanInventory()
    if args.list:
        print(do.get_inventory())
    elif args.save:
        with open('inventory.json', 'w') as inventory:
            inventory.write(do.get_inventory())


if __name__ == '__main__':
    main()

At a high level, we’re getting the tfstate from Terraform by running the following command: terraform show -json. Next, we generate hostgroups by piggybacking on the tags added to host resources during creation. Next, we parse through the other resources to get the subset of information that we’re interested in. Finally, we generate an Python object with all the data in the desired format. Finally, we dump it as a JSON object and either return it to stdout or to inventory.json.

The inventory output looks something like this:

{
  "tag-name-node": {
    "hosts": [
      "10.0.0.1"
    ],
    "vars": {
      "digitalocean_ssh_key_fingerprint": "00:11:22:33:44:55:66:77:88:99:AA:BB:CC:DD:EE:FF",
      "digitalocean_ssh_key_name": "sshkeyname",
      "ansible_ssh_user": "root",
      "web_mount_point": "/mnt/nfs/data",
      "web_mount_point_type": "nfs",
      "ansible_ssh_common_args": "-o StrictHostKeyChecking=no -o userknownhostsfile=/dev/null",
      "digitalocean_database_cluster_host": "something.ondigitalocean.com",
      "digitalocean_database_cluster_name": "db-name",
      "digitalocean_database_cluster_port": 25060,
      "digitalocean_database_cluster_private_host": "private.something.ondigitalocean.com",
      "digitalocean_database_user_name": "wordpress",
      "digitalocean_database_user_password": "password",
      "digitalocean_domain_id": "something.com",
      "digitalocean_volume_initial_filesystem_type": "ext4",
      "digitalocean_volume_name": "volume-name",
      "digitalocean_volume_size": 5,
      "nfs_node_public_ips": [
        "10.0.0.1"
      ],
      "nfs_node_private_ips": [
        "10.0.0.1"
      ],
      "nfs_mount_point": "/mnt/barista_cloud_volume"
    }
  },
  "_meta": {
    "hostvars": {}
  }
}

Now, if you try to feed this to Ansible as an inventory file, it will not be parsed correctly. The dynamic inventory JSON format is not the same as the JSON inventory format. This took me awhile to figure out and is honestly kind of frustrating as it makes creating a working JSON template so you can iterate and test quickly much more difficult than it needs to be. On the topic of gotcha’s, here a a few more to be aware of.

  1. Your inventory script does not have to be written in Python, but it must include a shebang at the top of the script so it can be executed (also it must be executable so chmod +x your script).
  2. The inventory script must accept the flag --list. It’s supposed to also accept --host and return details on a single host but I have not needed it nor implemented it.
  3. Even if you are not adding vars for specific hosts, you MUST include the _meta section in your inventory.

That’s about it. I will probably come back around and clean this script up and make it more reusable. Heck, I might put together a boilerplate script that can make creating custom dynamic inventory scripts quicker. As mentioned before, this is a first pass attempt to get something that works for my use case.

Finally, I feel I would be remiss if I did not include the tidbits of info I found scattered around the web that helped me figure this out.

https://www.jeffgeerling.com/blog/creating-custom-dynamic-inventories-ansible (Jeff, as always, is an invaluable resource on all things Ansible.)

https://docs.ansible.com/ansible/2.9/dev_guide/developing_inventory.html

https://adamj.eu/tech/2016/12/04/writing-a-custom-ansible-dynamic-inventory-script/

Thanks all folks. Have a good weekend!


Using Terraform to Manage DigitalOcean Resources

I am a fan of DigitalOcean. What they lack in breath of services they more than make up for with the ease of use, documentation, and tutorials. Last year, I overhauled this website to be driven by Ansible. This year, I want to take this automation to the next level. There are capability gaps using Ansible to create infrastructure that I’ve had to work around by doing some tasks manually or by writing custom scripts.

An example of this comes when trying to create a managed database cluster. Ansible cannot do this so I wrote a Python script to handle database management.

https://github.com/seaburr/WordPressOnDigitalOcean/tree/master/roles/database-server

I do not feel DigitalOcean should fill the gaps either. Why? Because Ansible is a configuration management tool that ensures resources are configured in a desired state. Infrastructure creation is not Ansible’s job. There are specific tools for infrastructure creation… Enter Terraform.

Terraform is a tool for defining providers (like DigitalOcean or AWS) and the resources (like droplets, load balancers, etc.) that your environment requires. Terraforms intent is to compare your infrastructure to your desired state and make corrections to bring your resources into compliance. It is a different concern from HOW the infrastructure is configured.

Over the next few months, I’m going to migrate infrastructure concerns out of Ansible and into Terraform. In fact, I’ve already got a POC to share.

https://github.com/seaburr/Terraform-On-DO

This repository defines the new standard for infrastructure that I am aiming for.

Here’s a simple mockup of the goal:

I did try to use the built-in graph functionality of Terraform to show this but it came out looking like this:

I’ve got boxes full of Pepe!

Anyways, it’s a work in progress. I’ve run into what I believe is a bug with the DigitalOcean Terraform provider and I’ve already raised a ticket with them to get resolved.

Next time, let’s actually learn something and dig into a resource and the provider configuration.


Borked Website: A Short Story

Today, I broke this website while testing some minor changes to the deployment scripts. I tried to figure out what went wrong (I messed up something with Apache while trying to renew the SSL cert). I couldn’t get it sorted out so I blew up the droplet (VM, EC2 instance, whatever) and re-executed the existing playbooks. What enabled me to do this? How was I able to do this?

Things that allowed me to recover:

  1. These scripts include daily backups so even if the entire WordPress deployment needs to be re-created from scratch, the data is tarred up and ready to go.
  2. The website data is not stored on the VM but an attached persistent volume.
  3. The database is a standalone, managed MySQL instance.
  4. Playbooks and roles are designed to be idempotent so re-running them is safe. They aim for desired state meaning no change if it’s not needed.

How I recovered:

So I simply destroyed the droplet, recreated it, and re-provisioned it. I had to perform a few tasks manually in DigitalOcean (whitelisting the droplet IP to the MySQL instance and pointing the floating IP to the new droplet) but even these tasks can be automated in the future (and will be).

All in all, I spent about an hour trying to figure out what I broke and another fifteen minutes to blow away and recreate the host. This is the way… Or at least, this is the way towards the way.


XPS Life

I’ve had my XPS 15 for three full days now. Have I formed an opinion on it? What are the pros and cons of this machine? Is it worth the money? Before I answer those, I should circle back around and provide some more details on my use case for the XPS 15.

You can tell I’ve been using macOS for years, can’t you?

Use Case & Goals

My intention is to replace two computers: My aging MacBook Pro and my gaming desktop. At first glance, that sounds like a near impossible task. I’m getting rid of macOS in favor of Windows and I’m reducing raw computing power. This is true. Nothing comes without compromise. The goal is to get close enough while reducing the amount of e-stuff I own. In the case of the MBP, my work issued me a 2019 MacBook Pro so I still get to use macOS when needed (thus having a second, personal Mac seems redundant). On the desktop front, I don’t play AAA games often anymore so the desktop has mostly become a test bench for VMs and Kubernetes. The desktop sits idle a lot of the time, wasting electricity (though it DOES do a lot of good for World Community Grid).

Look at all the bezel Dell managed to hack off.

With all that said, let’s get into the XPS 15!

Benchmarks

Let’s get the numbers out of the way first. I chose to benchmark all three systems with Geekbench 5.3.1. For the XPS and my desktop PC, I also collected 3DMark benchmarks.

XPS 15 Specs: i7-10875H / 32 GB DDR4 / 1TB SSD / GTX 1650 Ti 4GB

MacBook Pro Specs: i7-6700HQ / 16 GB DDR3 / 250GB SSD / Radeon Pro 450 2GB

Desktop Specs: AMD Ryzen 2700x / 32GB DDR4 / 512GB SSD / Vega 56 8GB

BenchmarkXPS 15 (9500)MacBook Pro 15″Desktop
GB 5.3 Single Core12677281049
GB 5.3 Multicore791830167348
GB 5.3 OpenCL443461062476454
Time Spy Overall3577n/a6657
Time Spy GPU3408n/a6419
Time Spy CPU4987n/a8430
Max Temps (CPU / GPU)93C / 77Cn/a68C / 72C
The 2016 MacBook Pro CPU still holds its own but look at the GPU performance.

The take away is this: I’m losing about 50% of my GPU performance vs the Desktop, CPU performance stays in the same ball park, and I’m gaining substantially over the Mac, especially as it pertains to GPU performance. None of this is a shock, really. The only thing I want to call out is this: Intel has struggled for years to get their CPUs manufactured with a smaller feature size out the door and it shows. This is a mid-spec mobile 6th gen (4c/8t) vs high-spec mobile 10th gen (8c/16t) CPU and performance is in the same ballpark per thread.

Apple manages to keep it thinner, mostly at the expense of thermal performance.

Pros

  • Screen is beautiful. Once you use the XPS 15, the MacBook Pro (both the 15” and the 16”) bezels look chunky and old school.
  • The touchpad is fantastic. I find it a better and more accurate experience. The click isn’t quite as nice as the MacBook’s haptic feedback but it’s by no means bad.
  • Battery life is great
  • Compact. This really is a diminutive 15” notebook.
  • SD Card reader. As a photobug, this is such a plus.
  • Can game on it, since it’s Windows and brings a powerful GPU to the table.
  • Keyboard is better than the 2016 MBP. What a train wreck the butterfly mechanism turned out to be…
Apple, until you make laptops thinner than an SD card, there is no excuse.

Cons

  • WSL2 is just not as convenient as native support that macOS and Linux enjoy for my development tools and workflows.
  • Speakers aren’t as good. No laptop speakers can beat the MBP so you just gotta deal with it. NOTE: This post on /r/dell helped.
  • Windows lacks some of the polish of macOS. I was a long time Windows user but after getting used to macOS in the past few years, you start to feel all the little gaps in Windows that the macOS folks nailed.
  • This machine is HEAVY. It weighs 4.5lbs while my 15” MBP comes in at 3.9lbs. While that doesn’t sound like much, you notice it because more because of the smaller footprint of the XPS. NOTE: My 2019 MBP weighs 4.3lbs.
  • Screen is too bright in low light situations. It’s borderline blinding when used in bed at night. NOTE: You can resolve this via Dell PremierColor and/or by switching to f.lux. See this /r/dell post.
They both look #premium tho.

Value

Value is subjective. If you want a powerhouse of a machine, look elsewhere. Get a gaming laptop. If you want the closest thing the PC world has office to the build quality of a MacBook Pro, look no further. The closest spec I can build on Apples website is $3200 and as spec’d, this machine is $2550 from Dell.com right now. $650 buys a lot of dongles, yo.

Make sure you calibrate your screen if you’re planning to do photo work. You can get close to the MBP color accuracy just by changing the color space to sRGB in Dell PremierColor.

Final Thoughts

If you want a Windows machine with near Mac levels of build quality and mobile workstation performance, this is your horse. If gaming is important and you don’t mind the 16:9 aspect ratio, consider the HP Envy 15 which can be optioned with a GTX 2060 and comes with a more stout cooling solution, like the XPS 17. If you want old school cool, get the Lenovo X1 Extreme. If you want macOS, get an Intel Mac while you still can.


Dude, I’m Getting a Dell

I finally pulled the trigger and purchased a Dell XPS 15 to replace my 2016 MBP.

Why not another Mac?

I have nothing against Apple notebooks. In fact, my work issued MBP16 is absolutely fantastic. What drove me back to Windows were a few things:

  1. The keyboard and screen hinge issues I’ve had with my MBP bother me so much that I do not want to spend my money on another Apple device.
  2. WSL2 solves a lot of the use cases that drove me to switch to macOS in the first place.
  3. Apple is abandoning Intel/x86 which in the long run might be a great move though I don’t want to be caught in the middle of it.
  4. There are some fantastic Windows notebooks on the market nowadays (XPS, X1, Envy, Spectre, Surface, ZenBook, etc.).

What else did you consider?

  1. Lenovo X1 Extreme Gen 3
  2. HP Envy 15
  3. XPS 17

The XPS 17 is just too big so I eliminated it pretty quick. I considered it over the XPS 15 because it’s available with a better GPU (RTX 2060) and better cooling (vapor chamber). Considering those two factors, the HP Envy comes into focus… On paper it has it all.

The HP is a fine machine but with it’s 16:9 display, less color accurate (and hyper glossy) display, and lesser keyboard, I had to eliminate it. As you can see, a theme around keyboards is emerging, thus the Lenovo must be considered.

The Lenovo was the hardest one to walk away from. It’s rugged, it looks like a business machine, and it’s got as much horsepower as the XPS. Additionally, the keyboard is amazing. It’s probably my favorite laptop keyboard. Finally, it has the best array of IO of the bunch. What’s its Achilles heel then? The display. It’s only alright.

The Dell XPS ultimately was the goldilocks machine that worked best for me and with discounts, it was also the cheapest (not by much though).

Once I’ve used the it for 2-3 weeks, I’ll probably write up a more in depth review.


WordPress on DigitalOcean Updates – October 10th

Todays changes are around reducing excess memory consumption by php-fpm with the hopes of preventing swapping and low memory alerts.

https://github.com/seaburr/WordPressOnDigitalOcean/commit/b37a43e0616aef7ba390b6fb9686be2e9d71df58


WordPress on DigitalOcean Updates

This project hasn’t been touched in a few months so last night I embarked to give it a spin. It failed. Miserably. So I went bug-hunting and got it working again.

Resolved Issues

  • centos-base
    • Removed packages no longer available that were causing role to fail.
    • Added package Glances to replace htop.
    • Fixed an issue with fail2ban configuration tasks.
    • Enhanced fail2ban configuration.
  • create-swap
    • Resolved a typo in a task that prevented swap file from being created.
  • install-apache
    • Enabled gzip compression to reduce page load times.
    • Enabled caching to reduce page load times.
    • Removed hardcoded values in vhost.conf.j2 that would have resulted in a misconfigured HTTP to HTTPS redirect.
  • install-certbot
    • Fixed issues that would have prevented automatic renewal cron job from being created.
  • create-droplet
    • Changed default droplet size from 1gb to 2gb.
  • destroy-droplet
    • removed hardcoded region that would have prevented deleting droplets not deployed in region NYC1.
  • install-wordpress
    • Fixed an issue where MySQL port was not being added to wp-config.php, preventing WordPress from starting.
    • Fixed an issue where Apache could not access document root.
    • Fixed an issue where wp-config.php was getting incorrect database connection details.
  • database-server
    • Simplified data returned from script used to create database servers to resolve an issue in install-wordpress.

See commit: https://github.com/seaburr/WordPressOnDigitalOcean/commit/f6226a2ac92a71f891dc23a6fc04a3d521fb227a

Next steps will be focusing on adding an automatic build job to help ensure that this code is always in good, working order.

Have a good weekend and take care of yourselves.


Speed Up Terraform Init

We have a lot of build processes that utilize Terraform to perform destroy and apply command. This results in a ton of terraform inits that download the same provider plugins over and over again. You can recover this download time and reduce the risk of Hashicorp giving you the banhammer (which I haven’t heard of them doing but you never know) by configuring the provider plugin cache.

https://www.terraform.io/docs/configuration/providers.html#provider-plugin-cache

Give it a shot and speed up your terraform jobs!


Ansible and Text Encoding and Line Endings and Git and Windows and Frustration

I ran into an issue the other day with Ansible while provisoning a Windows machine. After installing InstallShield 2015 SAB, Ansible copies a small license file configuration file into the installation directory.

[FlexNet Publisher Server]
Server=Port@ServerName

That’s the configuration. Should be easy right?

Not in this case. I was confounded by errors in while testing the installation. If I opened up the file using Notepad and saved it, InstallShield would start working.

I had tried all of the usual suspects once I realized there was something wrong with the file. Change the text encoding from UTF8 to Windows ANSI. No change. Change the line endings from LF to CRLF. No change.

So what was going on?

As it turns out, my text editor (Atom) was adding an extra LF to end of the file. Why would it do that? Well, this part of the POSIX standard.

See: https://gcc.gnu.org/legacy-ml/gcc/2003-11/msg01568.html

Before saving.
After saving.

To get around this issue, I uploaded this file to Artifactory and I treat the configuration file as an artifact, like the InstallShield installer, and just download and copy it to the installation directory.

This is a reminder to be conscious of how Git and your editor treat files when you’re provisioning Windows machines. Occasionally, you will still run into maddening little issues like this. I don’t want to admit how much time this thing left me stumped.


Re-Architecting This Website VIII

“Done. For now…”

All of my goals for the first re-architecture of this website are now complete. This evening I fixed the backup script, added a role that installed EFF’s certbot, and updated the README to reflect the current status.

You can see what’s new here: https://github.com/seaburr/WordPressOnDigitalOcean

Have a good week. In the coming weeks, there will not be much activity as I’ll be changing gears to Kubernetes.